Can you please point me to the best place to find the video Paul made where he combined the best of the two berm constructions, Missoula & Oehler? Thank you.
↧
Looking for DVD
↧
little woehlerfati progress
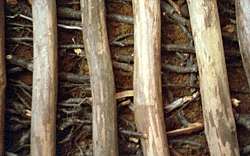
I had posted some ideas a while back so I thought I'd post an update of my little oehler / wofati inspired structure.
It's been a slow-going spare time project, and tons of fun. The biggest challenge has been working with the big heavy logs... first collecting them and hauling them up the hill, and then lifting them in place. No heavy equipment used. You will see my makeshift greek crane in a couple of the pictures, which was a great solution suggested by a permies member on these forums.
Hopefully will have something more complete by the end of the summer :)
↧
↧
Cheating a wofati.
My hope with this post is to help all who read it either shy away from my exploit or embrace it. With the discussion we hope to iron out skipping a step. Now, onward.
I was camping on my 2 acre plot and trying to simplify the plan. Now, what do you think about a simple design, say ten by ten wofati and instead of digging out all 4 holes for the structural posts, digging three and chopping down the last one at the desired height? The results would be a root foundation. Obviously you could potentially do this with all four posts provided they were already in the desired spot. Unless this is a stupid idea because the roots would eventually rot or worse collapse and with people inside it. I am exploring options. I have helped build wofati 0.8, but for many reasons I believe we could have gotten it built much faster, not to say it wasn't a success or filled with learning lessons.
Also is it possible to graft the bonds once
secured by spike? I am thinking a total grafted structure would have better overall strength. Am I off to think these things, or am I on to something here? Would the roots rot or pop under the pressure? Perhaps if the central post was living and then you dug the proper four holes and then did a traditional wofati with a tree popping out from the top. The living tree could get everything absorb the residual moisture from underneath you and so no real load on the center tree.
Lots to explore, help me to not die.
↧
Vikings didn't have liners
But they still built earth homes. I see some other threads along the no-liner option but I didn't see any specifically mentioning Viking stuff. If I'm repeating things, throw me out!
http://www.hurstwic.org/history/articles/daily_living/text/Turf_Houses.htm
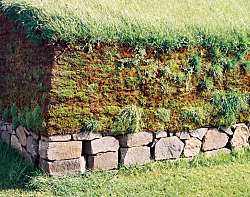
This group generally deals with Viking culture but they have this great article on why the old Viking style earth homes were more suited to Northern climates than many modern earth homes.
Particularly interesting is how they dealt with keeping the earth off the structural beams.
![]()
These guys use cut sod more than they are using loose earth. I think this is the biggest difference from the typical wofati train of thought. So it's not suitable for all locations (I have woodland lot, so I'm still searching for my linerless plans) but there're loads of people living in grasslands.
And here are some other potent pictures from the article that might help wofati thoughts.
![]()
![]()
This last photo has me thinking of some ways to increase the drainage around wofati buildings.
http://www.hurstwic.org/history/articles/daily_living/text/Turf_Houses.htm
This group generally deals with Viking culture but they have this great article on why the old Viking style earth homes were more suited to Northern climates than many modern earth homes.
Particularly interesting is how they dealt with keeping the earth off the structural beams.
These guys use cut sod more than they are using loose earth. I think this is the biggest difference from the typical wofati train of thought. So it's not suitable for all locations (I have woodland lot, so I'm still searching for my linerless plans) but there're loads of people living in grasslands.
And here are some other potent pictures from the article that might help wofati thoughts.
This last photo has me thinking of some ways to increase the drainage around wofati buildings.
↧
wofati in tropical climate?
Hi. Until today I did not know 'wofati'. I think it's an interesting way of building.
Because of my idea for a project at the tropical island Curacao (Caribbean, Netherlands' Antilles), I ask myself: would this be possible there? Curacao has a dry climate, but with a wet season, sometimes very heavy rainstorms (October - January). When you build a house there that's 'eco-friendly', it has to keep the warmth (sunlight) out, and the cooling wind (mostly from North-East) in. When the house is in a sloping hill, the rain must NOT flood it! These are all things to think through before starting.
The spot I have in mind to start the project (see blog http://curaduracuracao.blogspot.nl/2015_04_01_archive.html ) has a hilly ridge, but only the part facing South. I think that's OK, for the most insulating 'earth roof' part of the wofati will then be facing the hot South side and keep the warm sun out. Then some ventilation pipes, like you mention for a cooling cellar, can be added, the inward pipe coming from the East side and the outward going in Western direction (so the air flow passes the house diagonally). But to keep the water out when it rains, I think it needs some very strong dams!
I don't know if the trees growing there (at the South side of the hilly ridge) are right for the needed wood. Wood is not often used on the island, nowadays all houses are built of concrete blocks, in the past small houses were like cob or adobe and larger houses of imported bricks, sometimes imported wood. But, as I said, there are trees growing there! I'll show you a photo here.
What do you (all) think, do you have other ideas, things I forgot maybe?
![]()
Because of my idea for a project at the tropical island Curacao (Caribbean, Netherlands' Antilles), I ask myself: would this be possible there? Curacao has a dry climate, but with a wet season, sometimes very heavy rainstorms (October - January). When you build a house there that's 'eco-friendly', it has to keep the warmth (sunlight) out, and the cooling wind (mostly from North-East) in. When the house is in a sloping hill, the rain must NOT flood it! These are all things to think through before starting.
The spot I have in mind to start the project (see blog http://curaduracuracao.blogspot.nl/2015_04_01_archive.html ) has a hilly ridge, but only the part facing South. I think that's OK, for the most insulating 'earth roof' part of the wofati will then be facing the hot South side and keep the warm sun out. Then some ventilation pipes, like you mention for a cooling cellar, can be added, the inward pipe coming from the East side and the outward going in Western direction (so the air flow passes the house diagonally). But to keep the water out when it rains, I think it needs some very strong dams!
I don't know if the trees growing there (at the South side of the hilly ridge) are right for the needed wood. Wood is not often used on the island, nowadays all houses are built of concrete blocks, in the past small houses were like cob or adobe and larger houses of imported bricks, sometimes imported wood. But, as I said, there are trees growing there! I'll show you a photo here.
What do you (all) think, do you have other ideas, things I forgot maybe?

↧
↧
Barrel vault Earth Shelter?
We want to build an earth sheltered house dug into a south facing hill on our property. We are thinking of a hobbit style house, long and narrow, cement walls going up 6 or 7 feet then a brick barrel vault as the roof from end to end. Kinda like an old brick wine cellar.
Has anyone tried this? We want round doors and windows, (hobbit style) I am not an engineer, I think a vault pushes out on the walls, so we may want to back fill on all sides, and around the windows and door.
We would like to know if anyone has built something like this or at least if this would work. We are thinking maybe 12feetX40feet long.
thanks all
↧
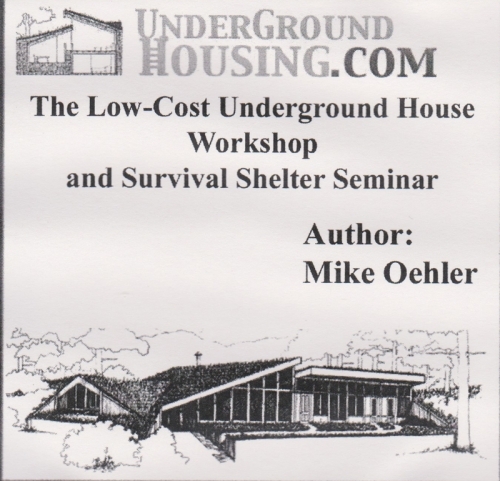
Mike Oehler: The Low-Cost Underground House Workshop and Survival Shelter Seminar 3 DVD Set
This Set includes Workbook, Design Kit and Shelter Plans and buying the digital download saves over half off cover price!
![]()
Description from scubbly:
Nothing we know of comes remotely close to matching the wealth of knowledge found in this six-hour three-DVD set. The design course taught in DVD two is worth hundreds of times the cost of the set in the increased light, views and air. It will benefit your subterranean home, and the resale value will skyrocket.
If you are convinced you want to build below surface, need more information to make up your mind or your mates mind you need this set. It is valuable to owner/builders, architects, contractors and self-designers alike.
Instructor Mike Oehler has taught at architecture departments at colleges and universities across the U.S., Canada, England, Scotland, Germany, the Netherlands and Belgium. Having the material down pat he is able to anticipate your confusion and questions. And unlike the live workshops, the videos allow you to study the material repeatedly and to share it with friends and family.
DVD 1 Construction
The Post/Shoring/Polyethylene (PSP) method of building underground with the warmth and charm of wood is explained in the first DVD. A layer of plastic which protects the wood from the damp of the earth is the secret. The original structure built by this method as an experiment in 1971 for $50 is still in use. Instructor Mike Oehler lived in it for 30 years. He is now working on the stunning PSP earth-integrated Ridge House with its thirty-mile views.
This DVD winds up with a slide presentation showing construction and completion of a number of underground homes built by this method. Construction costs can be as low as 1/10th the cost of normal construction -- sometimes even less.
Get the DVD Set Here!
DVD 2: DESIGN
This is the heart of the workshop. Using chalk board scale models he has hauled for years to universities across North America and Europe, Oehler teaches his revolutionary methods of underground design. Rejecting the four common methods (the foolish four: skylights, atriums, vertical window wells and the incredibly poor first thought design) he teaches instead twelve methods which guarantee light, views and air from any and all directions of the compass in each and every underground room. No more airless dark, basement-like underground buildings! Mike is fond of saying "An underground house has no more in common with a basement than a penthouse apartment has with a hot, dark, dusty attic."
You will actually design five underground homes during the screening of this DVD using the downloaded copyrighted design kit. These hands-on exercises drill the methods home and are actually fun! Upon completion this course you will have a better concept of underground design than the vast majority of practicing architects today.
This DVD winds up when Mike takes you on a personal tour of the four underground or earth sheltered houses on his land. You see real life applications of Up Hill Patios, Hollywood Wings, the Royer Foyer, Basic Designs and more.
Get the DVD Set Here!
DVD 3 SHELTER
This third DVD teaches how to build a shelter for pennies on the dollar. It can take your family and friends through nuclear fallout, raging fires, hurricanes, tornadoes and even earthquakes. If surrounding above-ground structures have been destroyed, it may be lived in and used as the starting point for an underground house. In normal times the shelter may be used as a root cellar, workshop, spare bedroom, kids play house or tool shed. The cost of a 12x12 shelter should run from $100 to $1500 depending on how many recycled materials you use and how much of the work you do yourself. Included are comprehensive shelter diagrams without additional cost.
The second part of this DVD teaches how to design and build a wonderfully effective earth-sheltered greenhouse. The prototype of this, invented and built by Mike Oehler on his 40 acres in mountainous North Idaho, just 30 miles south of the Canadian boarder, was in service for a quarter century. This greenhouse took tomatoes into the second week in December and hardies like kale and cabbage clear through the winter year after year without any source of heat other than the sun and that which is trapped in the earth.
The greenhouse is resistant to the ravages of moles, rabbits, deer, gophers and most other plant predators. This greenhouse can even collect its own irrigation water. A 10x30 unit should cost between $200 and $3000 depending upon materials and labor.
The third part of the shelter DVD continues with a slide-show of the of the underground structures on Mike’s land. It includes astonishing effective earth-sheltered greenhouse.
Get the DVD Set Here!
↧
Insulation and earth sheltered construction
I just finished building a pit greenhouse frame , the front however is exposed and has a door and a stone wall covering it. I have some 4" poly iso insulation, and placed that in the front to add to the minimal insulation value of the stone wall. My question is do I place insulation on the other 3 walls, the back is aprox 4' deep, and it tapers on the sides to the front where it is aprox 40" buried? I know I want the benefit of the Earth tempering, should I only place the insulation along the walls, just below the windows, to down aprox 1' or further into the soil? Or go to the bottom of the interior wall?
↧
Mike Oehler Youtube video from Kirsten Dirksen
I don't see a post on this yet, also, perhaps this isn't the best forum, I can't believe there is only building form for Mike Oehler structures.
https://www.youtube.com/watch?v=8B6xR3T37gI
https://www.youtube.com/watch?v=8B6xR3T37gI
↧
↧
Building a "Hobbit Home" input helpfull .
well guys and gals, I need some input on those of you who have experience with concrete walls.
I have submitted my drawings too the local building department, too see if they will even let me build my "hobbit home" on the existing site . . .
Here is the plan. Pour the concrete wall, paint on a damp proofing layer too seal the outside of the concrete - insulate with about 8 inches of Styrofoam - directly against the wall - then on the outside of the foam - apply the necessary waterproofing layers - the idea being, that the concrete will be a thermal flywheel - stabilizing the temp inside the home, while the insulation (all the way around the house - top and bottom) will keep the place warm.
The now retired building inspector tells me that when the concrete is poured, they can set in 2x4 studs - so when they remove the forms, you have a ready made stud work to fasten dry wall and stuff.
Now - the question is, should I let the guys put the studs right into the concrete ? Or - should I pour the concrete wall first, then lag bolt the studs too the concrete myself - leaving a 1.5 inch ventilation gap in between the drywall and the wall for ventilation- wiring - water pipes etc. . - this method would probably cost alot less to finish - since I can do this myself instead of paying someone too fasten them too the forms - and I kinda like the idea of having a ventilation gap - for circulation. .
This is not about what I want. It's about what is better too prevent mold - mildew - and any other nasty stuff.
Opinions wanted and appreciated.
↧
Ant Wofati Progression
Davin Hoyt assists with the designs of Ant wofatis, and videos progress.
↧
straw bales instead of dry earth
Okay, so here is a possibly very dumb question, but it's eating me (and I can get straw bales cheap and put them in place myself, whereas I need to rent a guy with a big machine for the earthworks), so if anyone can help clarify this, I would be grateful...
Since the R value of straw bales is at least three times the R value of dry earth, if I understood Paul's wofati article right, could I replace the dry earth between the two layers of poly with 1/3 that thickness of straw bales?
Would the 8 inches of (wet) earth on top of the second poly be heavy enough to keep the whole thing down?
Thanks,
Saskia
↧
Walipini Roof Angle
Hello there! I want to construct a walipini design greenhouse. I've read as many information as I could but one thing that embarrassed me is the roof angle. I live in a town in Northeastern Bulgaria, 43 degrees latitude. Can you help me calculate my roof angle so that I can maintain an aquaponic system in it through winter and summer. Mind that the average temperature is roughly 11 degrees - 20-35 degrees during warm seasons and 10- -1-,-2 degrees during autumn and winter. I would really appreciate any help & suggestions because this is my first time ever trying such construction. Thank you in advance.
↧
↧
Binishells?
I apologize if this topic has come up before, but has anyone heard of/built/seen a binishells? From what I can tell, it's a steel reinforced concrete dome structure built using an inflatable support. The only online price I can find says they start at $3500, but I don't know what size and if that includes labor.
http://www.binishells.com
http://www.binishells.com
↧
New build ideas - sunken greenhouse for underfloor heating... thoughts?
Hi y'all,
Anyone tried this take on AGS before? Digging out a metre deep to sink a greenhouse - using the spoil as a thermal battery, blowing hot air from the greenhouse into it via heat tubes?
The house would be a straw bale job to insulate the battery, the corridor to the north of the house should act as a cold sink and would be good for food storage etc...
Not sure whether or not to insulate on top of the mound in the house to limit the heat it will give off, could be too much!
Would love to hear any thoughts.
![]()
![]()
![]()
![]()
![]()
![]()
Sean
Anyone tried this take on AGS before? Digging out a metre deep to sink a greenhouse - using the spoil as a thermal battery, blowing hot air from the greenhouse into it via heat tubes?
The house would be a straw bale job to insulate the battery, the corridor to the north of the house should act as a cold sink and would be good for food storage etc...
Not sure whether or not to insulate on top of the mound in the house to limit the heat it will give off, could be too much!
Would love to hear any thoughts.


Sean
↧
All natural earth berm?!
[youtube]My wife and I are currently wrapping up our first year on our 40 acre homestead in Eastern KY. We have so far lived in a Wall tent and are finishing our first building, (a timber frame workshop) which will be home until we get a house constructed.
Living so close to nature, in all its ever changing glory we have felt first hand the extremities of -30 this winter to +90 this summer.
We wish to design a home that uses no AC to cool in summer, a mass heater to warm and cook with in winter, and is built with as close to 100% natural, local, and sustainable materials as possible.
I started reading JRR Tolkien at the ripe age of 12, and have always loved hobbit style houses. We are leaning in the direction of an earth bermed home to accomplish our energy and shelter needs but are unsure of the best building method.
I have read Rob Roys book on underground housing, and though nice I don't agree with the concrete slab and plastic covered wood roof. He states a persistent problem with carpenter ants in his own houses and is unsure how to handle them…
I posted a while back on the idea of a cement block and clay brick barrel vaulted method/idea for an earth sheltered house, and though it seems viable, I do not like the cost and unsustainablility of that idea.
I have seen pictures of Viking houses built underground, as well as other (scottish) stone age buildings, which employ rock foundations and wood covered in sod roofs. These seem neat, though I am unsure how the comfort level was then? DId people mid mold and condensation in a home in those times? Or were there just bones, hides, and filth littered on the floor, and no one cared because you only lived to be 24 anyway? lol
But seriously, we are thinking maybe some blend of the (50 dollar and up) underground plan and a timber frame sheathed in Hemlock to be most ant retardant would be an option?
We have also considered a timber frame which has a level underground (such as a basement) but open to a roof (well insulated) would give most of the elements needed in our climate for a comfortable living area without AC and negate the issues with trying to waterproof a wooden roof…
I should note, on our site we have at our disposal all the clay soil, sandstone rock, timber, creek gravel, sand we can use. We have a local feed store who stocks OLDCASTLE brand type S (we believe) hydrated lime. We would be tickled pinkish if we could use only these natural and local things, but understand we may have to go and buy a few things.
I would welcome any ideas and comments. Ive seen such great ideas on clay/lime and other floors I'm excited to hear what might be possible. I will try to post a few links to our current builds to any who may enjoy.
Thanks
Josh[/youtube][youtube][/youtube]
↧
Wofati in Canada?
The average temperature in Canada's capital (Ottawa) is a balmy 6 degrees Celsius (42.8 degrees Fahrenheit). Wouldn't a Wofati be really fuckin' cold? Even if the windows were open during the entire month of July (which averages 20°C), I can't imagine the thermal mass would get hot enough to maintain a comfortable temperature. Am I misunderstanding how this works, or is it simply not a viable design for colder climates?
↧
↧
My Earth Bermed Dream Home
Hello all my permie friends, I have been researching earth bermed housing for quite some time, about 5 years, I am now settling on a design which balances price, sustainability, time to construct, and aesthetics. I have decided on a monolithic dome made of geopolymer and geopolymer air-crete for insulation with arches for windows doors and straight furniture. I would like some input on my design ideas from all you walking, talking, parallel processing, pattern recognizing super computers.
I have looked at the WOFATI design that Paul likes but I would prefer a round domed structure for aesthetic reasons and because of the fact that it is the strongest possible structure in nature. WOFATIs also have a limited life span as they are a wooden structure. I know that life span is probably 80 years or more but I would like something that could last centuries and house generations of people.
Pros: cheap to build; strong structure; very local sourced materials; fast to build
Cons: limited life span; requires an impermeable layer to prevent water infiltration; wood posts require protection where in ground; not round or domed
Next I looked at earth bag and super Adobe building methods. These methods are cheap, easy to learn and provide very strong structures that can bermed. However it does take a lot of labor to fill bags and I am not a big fan of using synthetic materials for the bag. That is of course a personal choice.
Pros: cheap to build; can be built into a circular domed structure; very strong structure; fire proof; flood proof; earth quake proof
Cons: uses synthetic materials; lots of time and labor; difficult to build a "perfect" dome; requires a synthetic impermeable membrane
Monolithic domes are real super structures. They are fire proof; flood proof; earthquake proof; tornado proof; hurricane proof; and bullet proof. They will last centuries if not longer and are the strongest structures we know of. They can be built in a single day by using inflatable air forms and shot-crete and insulation can be made by mixing in a foaming agent. Arch ways provide flat surfaces on the otherwise rounded dome for windows, doors and to connect more than one dome.
Traditionally monolithic domes are made of cement but as cement tends to crack, is hydrophilic and produces a lot of co2 in its production I wanted to find another material to use. Geopolymers are cement like substances made from a variety of rock dusts, fly ash, or iron blast furnace slag and a strong base like lye or sodium carbonate. All of these materials are either waste materials form industrial processes or are very inexpensive. Geopolymer are essentially man made rock. Recent research suggest that the pyramids in Egypt were made from artificially made lime stone blocks instead of blocks being mined from quarry. These man made stones are almost indistinguishable from real lime stone and they last of course for 1000s of years. Geopolymer shave up to twice the compressive strength of cement and up to three times the flexibility. I have also read that they are self healing if cracked but I have not a confirmed that.
A monolithic dome made of geopolymer would potentially not require a impermeable layer when bermed as it is one solid piece of rock.
Pros: everything proof; relatively inexpensive; lasts potentially for 1000s of years; can be built in days; aesthetically beautiful; very modular (easy to add additional domes)
Cons: needs some experimentation to create the proper mix of geopolymer precursors; permitting; need inflatable air form and pump.
I will post some videos and links to some of the stuff listed above. I will also work on a drawing of the house perhaps in google sketch up. In the mean time I would appreciate any input, critiques, ideas, or perhaps you can tell me how crazy I am.
↧
Norwegian, Saami, Norse Earth Sheltered Home
Found this documentary about a guy in Norway who built a traditional Norwegian earth sheltered home. Depicts some photos of construction and his daily life. It's in Norwegian.
https://tv.nrk.no/serie/der-ingen-skulle-tru-at-nokon-kunne-bu/PRMR70000105/sesong-4/episode-1
![]()
https://tv.nrk.no/serie/der-ingen-skulle-tru-at-nokon-kunne-bu/PRMR70000105/sesong-4/episode-1

↧
shipping container construction
where on this forum would i post/read about shipping container construction?
i want to use them to construct a brewery, my issue, insulation (thermal stability is needed for the beer fermentation). my current plan is to use earthern filled tires to build a retaining wall around 1/2 of the container, which will be on grade. then import material against the tires to create an hill. i know that containers are not designed for side loading, and will be crushed if loaded in that manner. i have seen people using rock gabians in a simular fashion to help support the conatiners, but tires are free.
↧